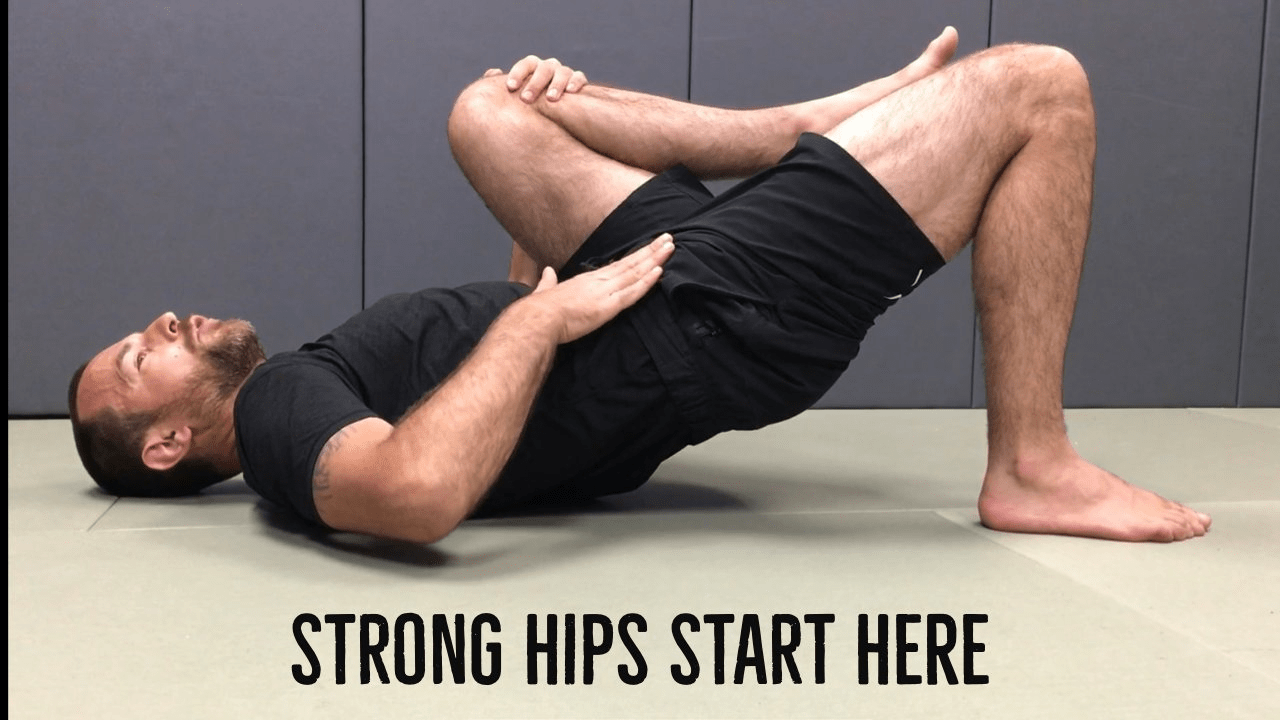
Develop Stronger Hips with this Single Leg Glute Bridge Exercise
Jun 29, 2021By Greg Mihovich
In today's video, Coach Mihovich walks us through a single leg bridge variation that will help you learn how to fire your glutes and hamstrings properly, so you can develop more strength and power. This is a detailed tutorial, so make sure that you have about 15 minutes to pay attention and try the strengthening exercises as discussed in the following video.
This exercises can help you to improve your mapping between your hip, your hamstring, glutes, lower back and your ankle and think of it as like a GPS. The finding that GPS is the more detailed it shows the about the corner street corners and science and different street layouts. The easier it is for you to find the correct address, same thing for your brain.
The better your mapping is the easiest for your brain to distinguish between different parts of your body and give you more specific, more targeted commands. So you end up having much finer control of your movement. And one more thing is going to happen when you're doing this exercise, you're going to do also strengthening your posterior chain in this end range of motion, as well as teaching yourself to fire your posterior chain, even when the knee or your ankle is in the less than ideal position, which is a common thing in combat sports. So you're going to improve your hip extension. You're going to help you solve to stabilize your lower back. You're going to lengthen your hip flexor envelope and without further ado, let's give it a try.
So first thing we're going to do is we're going to start with kind of like jiu jitsu guard kind of like an open guard position. You're going to be on one here. My leg will be tucked in your back is really tight. And then you're really crunched. Then when you're doing this, it's not a bad idea to maybe put a couple pads under your butt or something like that a couple of maybe big keypads and flip this to elevate your hips off the ground. This will make you round off less and a bit more comfortable when you're doing this. What I'm going to do is I'm going to put my foot flush on the floor. So the entire surface of the bottom of my foot, especially to the floor, as much as possible, I'm going to hug my knee like this. And first to just figure out what's going on, I'm going to sway my knees side to side the reason why my hands are going to be touching my knee is not so they hold it with some sort of like a lot of tension and prevented from moving. But rather than give my brain tactile feedback that if they need it does move lets me know that and I stopped that. So again, they knee stays in this position. I can also use two fingers. Now let's pay attention to the ankle what's going to happen is imagine there's like a sheet of paper like this, like a four sheet of paper, like a printed piece of paper or something like that. And someone's trying to seal it this way towards the inside of my body. So there's that attempt to drag the sheet of paper from underneath my foot. What I'm going to do is I'm going to tilt my ankle to the inside. So I'm going to create more pressure on the inner edge of the ankle. Notice, that happens without my knee jerk into the inside of my toes, lifting off or my foot roll in this way. So again, touching my knee. So I don't give my brain affect tactile feedback if I'm moving it or not. And all I want to do is just to move that ankle. And that movement is not much. Don't try to like set some sort of a record and I move the knee and we do the wrong thing. I think of this as like from a shooting world, we just learn how to use the trigger finger. The rest of the body stays put. So just the proverbial trigger finger as we move the ankle only tilted into the inside, creating the pressure in the edge of the foot. And as we're doing, it's very important that as we tilt from the ankle, it's not just the front ankle or the back. It's both. So trying to create pressure on the inside edge a bit heel as well as the inside edge of the foot right here. So the whole thing is tilting this way. Again, the motion is not much it's millimeters. So 20 times is so let's switch sets. So knee's not going to move one more way. I can iterate that point is that it's one point I'm not to move which you're not supposed to move rather than move what you're supposed to move. In other words, I'd rather you think real hard of tilting your ankle and it would, if nothing is happening, I wouldn't want you to need to be twitching to the inside. So even if nothing is moving, I'm just thinking real hard that I'm wanting to move my ankle only. That's better than when you give the command for the ankle to move your knees to achieve. If you can give the ankle a go, if not, just think about it again, just give it a proper intention. Think of the meaning of the word intention. And just practice it about, I don't know, 15, 20 times. And we're going to move on to a much harder
So what we're going to do is we're going to find a piece of floor property just going to lay down. I'm going to hug my knee to the chest. The reason why I'm hugging my knees to the chest is I want you to eliminate as much as possible the low back movement. When my knees away from my body easier for me to articulate my lower back. We're not going to bring my meat in. It's going to be easier for me to tuck my pelvis and keep my lower back stable. And that's what I'm trying to do. I'm trying to really fix this point in space with tension, the appropriate tension from the bride body parts, which I'll discuss with you in a second. And the move from my hip. So I'm going to bring my knee in a for most people two hands is good, but sometimes it causes you to real distort if the upper back and the shoulders a little tight and causes you to kind of be like this. So for some people, one arm is good enough. The same side and the other arm is here. It kind of gets them out of this whole position, which is not good. I'm going to pull that top edge of the pelvis up to my Rib cage. Pelvis is going to talk on there, which is going to also show them my hamster little bit, and tense up my glutes.
What I'd like to do is I'd like to whine up my shoulder here, which obviously they're kind of lined up unless I'm tilted, then my knee and my ankle in one line. So that would be mistakes. He caught my niece and I had to get out to the side. I went to bring my knee to the middle line. So now they are all lined up like this. My foot is flush on the floor, not too far, not too close, kind of like middle ground again, pelvis stuck. And I'm going to start lifting my hip up as I drive my knee forward over the ball of the foot. The focus is on my teen and pelvis socks to my back. That's not articulate. And then drive my knee forward rather than lift my hips up and over this way, then I'm going to retract my knee back. As I keep the pelvis stuck to my knee to the chest again, retract my knee forward, retract my new back. As it maintain the pelvis stuck, you can kind of tap your abs right here. If you wish to remind yourself about the constant attention in order to stabilize that back, so can extend your hip and drive it into the ground. We're going to do about 10 of those. So it depends how big you are, what's your body size and body type. But those are just approximate guidelines. Then on the 10th one, we're going to stay up. So my pelvis is stuck. So the inner edge of my foot is on the ground. I'm trying not to roll my foot. I keep my pelvis stocked. I'm keeping expanding this. I'm extending this bone this way over the ball of my foot. I've got to open up my knee to the side, bring it back to the middle. So I want to create pressure into the edge of my foot. And then I'm going to open the knee out against that pressure. As I'm tucking to pelvis and driving my knee forward over the ball, the foot at the same time, we're going to do 10 of those.
And on 10th, we're going to keep the open and we're going to start collapsing the ankle to the inside. What the practice before unloaded. I'm going to make sure that if my pelvis is stuck, I have to stay. My knee stays open doesn't jerk back to the inside and I tilt the ankle the best they can bring my knee back to the middle. I can reset if I'm feeling very fatigued or just keep going. And then I pushed down to the ball of my foot. That's in my heel lifts up.
You're going to feel like your hamstrings and your glute got pretty good workout. It's a good idea. If we could come up and walk it off a little bit, and as you're going to walk it off, the idea kind of walking it off is that you take this isolated exercise and now you're trying to feel how it feels when you're walking around, when you integrate into your motion. So right now I'm feeling that activated my gluten in my hamstrings pretty good and subjective feeling I have inside is that my hip is kind of pushing me forward. Now I do lots of these and also all kinds of other keep extension exercise for me, it's normal to walk into because of the hip extension and to drive myself with my hamstrings and glutes anyways. But regardless after the short activation, I'm feeling definitely feeling like my right side.
If you at the edge of my foot, you will see that I don't roll my ankle. There's constant pressure to the inside. As the knee goes out from the hip, I want to move just little. After 10 times, I'm going to leave it open. I'm going to stop tilting my ankle to the inside. And my pelvis is stuck and I'm still lengthening this femur this way, holding the leg open annual feeling of heat was working quite a bit. I'm going to come back to the center. If you come to the side, you will see that my pelvis stays stuck and nothing really changes above my body position. It's kind of like sprint step, if you wish. So I'm isolated dysfunction of the body, since I'm laying down, it'll be easier for me to manage my spine. And it's a little easier for me to understand what it's like when I take my pelvis under slightly, that it's my hip that extends in the pattern as opposed to my back. And that's the map. When I was talking to you guys about that, you're going to learn the difference between, this is where my hip extension and this is where my lower back extension begins. As I walk around, I feel like my kids are definitely awake. I feel like there was a nice drive from my hips was like somebody pushing me back. And now I'm much more likely to use this muscles, in all kinds of movements, whether it's knee shake down, scrolls, driving your hips into something or whatever. So enjoy.
Did you learn a few things from this video?
If so, we would love to hear your feedback. Be sure to subscribe to our Youtube channel and leave a comment below.
#fightcampcondtioning
Check Out Greg's New Ground Mobility and Movement Training Plan
 CAT System is a comprehensive movement system, developed by Greg Mihovich. CAT System is based on natural human movement patterns and proper joint articulation. It stems from ancient and modern Slavic/Russian health and martial arts practices.
A strong house is built on a solid and firm foundation. Your mobility, coordination and connective tissue strength along with proper breathing and the ability to relax form a firm platform for your health and athletic progress for years to come.
CAT System can help to:
- Free up your infinitive human movement potential
- Mobilize, increase and restore the full range of motion in the joints
- Improve general and skill-specific coordination
- Strengthen the joints, tendons, ligaments, muscles and fascia
- Improve general and specific conditioning
- Improve breathing
- Improve ground engagement, ground movement and ground dis-engagement skills
- Reduce or completely eliminate injuries from falling
- Help to avoid joint locks and restrains used in grappling and hand to hand combat
- Make warm ups fun and functional
Click here to learn more about Greg's Mobility and Movement Workout Plan